ELECTRONIC INSTRUMENTATION (MINI PROJECT)
MINI PROJECT: ESP32 SMART PLANT MONITORING SYSTEM
This project is about detecting the plant condition such as soil moisture, temperature and humidity with using the DHT11 temperature & humidity sensor, YL-69 soil moisture sensor as well as using the LDR Photoresistor to detect the light intensity.
How Does It Work?
Smart Plant Monitoring system is to let user to monitor their plant through their mobile phone application Blynk. With ESP32 microcontroller WIFI function, the data that collected by those sensor will be sent to user phone application Blynk and those data will be display on the application user interface. In this project, Three sensors are used as data collect tools to achieve the purpose of monitoring plant condition. Those sensors are DHT11 temperature and humidity sensors to sense the temperature and humidity of plant surrounding, YL-69 soil moisture sensors to detect the analog value of soil moisture reading, and LDR photoresistor also known as Light Dependent Resistor which used to detect the analog value of light intensity.
After that, these sensor data will send to the Blynk user interface to monitor their plant real time data. There are 3 display reading gauge for soil moisture, temperature, humidity and light intensity.
Component Used
1. ESP32 WROOM

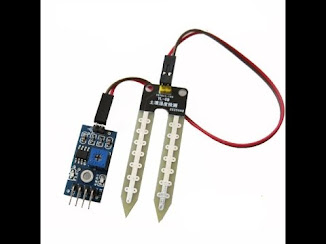
2. YL-69 soil moisture sensor
3. DHT11 temperature and humidity sensor

4. Light Dependent Resistor

5. 1k ohm Resistor

6. Blynk application

Circuit Design

Port declaration
DHT11 sensor - GPIO27
LDR - GPIO35
YL-69 Soil moisture sensor - A0
Blynk user interface

Coding Arduino IDE for this project
#define BLYNK_PRINT Serial
#include <WiFi.h>
#include <WiFiClient.h>
#include <BlynkSimpleEsp32.h>
#include <DHT.h>
// You should get Auth Token in the Blynk App.
// Go to the Project Settings (nut icon).
char auth[] = "BEBHWHgbUwP8X2_02Rnw5E3F6UujU-Xm"; //Enter the Auth code which was send by Blynk
// Your WiFi credentials.
// Set password to "" for open networks.
char ssid[] = "YZ"; //Enter your WIFI Name
char pass[] = "tan1150137"; //Enter your WIFI Password
#define DHTPIN 27 // Digital pin 427
#define sensor 35 // Digital pin 5
#define VIN 3.3 // V power voltage, 3.3v in case of NodeMCU
#define R 10000 // Voltage devider resistor value
// Uncomment whatever type you're using!
#define DHTTYPE DHT11 // DHT 11
DHT dht(DHTPIN, DHTTYPE);
int get_lux(void)
{ float LDR_Vout = (analogRead(sensor) * VIN / float(4095)); // Conversion analog to voltage
float RLDR = (R * LDR_Vout) / (VIN - LDR_Vout); // Conversion voltage to resistance in Ohm
int lux = 170 / (RLDR / 1000); // Conversion resitance to lumen, RLDR/1000 - convert Ohm to KOhm
return lux;
}
BlynkTimer timer;
// This function sends Arduino's up time every second to Virtual Pin (5).
// In the app, Widget's reading frequency should be set to PUSH. This means
// that you define how often to send data to Blynk App.
void sendSensor()
{
float h = dht.readHumidity();
float t = dht.readTemperature(); // or dht.readTemperature(true)
int LDR = get_lux();
int sensorM=0;
sensorM = analogRead(A0);
if (isnan(h) || isnan(t)) {
Serial.println("Failed to read from DHT sensor!");
return;
}
// You can send any value at any time.
// Please don't send more that 10 values per second.
Blynk.virtualWrite(V0, h); //V0 is for Humidity
Blynk.virtualWrite(V1, t); //V1 is for Temperature
Blynk.virtualWrite(V2, LDR); //V2 is for light intensity
Blynk.virtualWrite(V3, sensorM/10); //V3 is for soil moisture
Serial.println(String(LDR) + " LUX");
}
void setup()
{
Serial.begin(9600); // See the connection status in Serial Monitor
Blynk.begin(auth, ssid, pass);
dht.begin();
// Setup a function to be called every second
timer.setInterval(1000L, sendSensor);
}
void loop()
{
int sensorM = analogRead(A0);
int temp = dht.readTemperature();
int reading = sensorM/10;
Blynk.run(); // Initiates Blynk
delay(100);
if(temp >=35){
Blynk.notify("Water your plants");
}
else
{
Serial.println("do nothing");
}
timer.run(); // Initiates SimpleTimer
}
Assignment Video for mini project:
Comments
Post a Comment